Infestation
I've been satisfied with the general state of Qedy JS for some time now, but as I implement more modules, I keep finding many tiny bugs or glitches. Even though I try to be diligent during inital development, there are still tons of them.
Some are oversights in the code, others are oversights in the design and the rest are pure coding bugs. Like sometimes I use || instead of ?? or vice versa.
Other times, in Elem Converter I forget to work with the element instance (for a particular parent Component) and end up working with the element directly.
Scenes
You probably know it – there's a brilliant idea right from the start, but you didn't see it for years! Scenes is one of such things.
When you define layout i Qedy, you use model.graph to do so. And most of the time you start by defining various screens, using QView or QForm Components.
When switching between those screens, you need to make it visible and hide all the other screens, because you don't know which one is visible at the moment.
At first I created a helper method swap, which first argument was what comp to show and all other arguments were comps to hide. But if you add new screen, you have to modify many swap calls to add the new screen to be hidden as well. I'd like to automat that.
I kinda always liked the idea of iOS's Storyboard editor in Xcode, introduced for iOS 5 in 2011. It's very simple way of visualizing GUI of the whole app with flows between "scenes", which is basically just a View Controller:
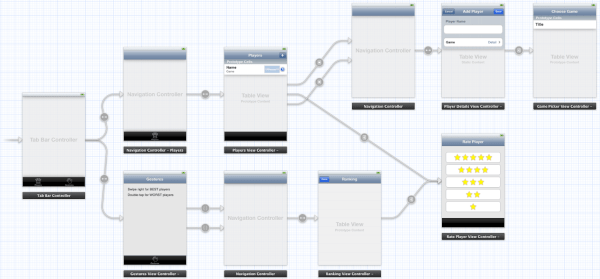
Storyboards of iOS app in Xcode (source: kodeco.com)
In Unity3D, "scene" is not just level or piece of a game world, but also Main Menu or different parts of the game. This would fit nicely into the platform ecosystem, as the system could be repurposed from Qedy in Qard as well.
So, when parsing a model, scenes are created from all named components directly in graph.add. And later, when switching scenes in the app, you call scope.scene("scene1") for scene1 to appear.
I'm thinking about automate it even more and allow scene names to appear in path, so to call scene1 you just navigate to /path/to/scene1. But I have to deal with path component mismatches first, as there will be plenty of edge cases.
Module Builder
…asdfa
Tutorial System
After I finished Creator, I felt like it would deserve a topping of some sort. For one of my previous versions of Qedy I created a simple scripted tutorials on live web page, mostly for forms.
I decided it was good enough to be revived for the current version, because the Tutorial System featured:
- *Virtual mouse cursor (pointer)*, which is basically just an image, that moves around. Thanks to CSS transitions I can only set a target top + left coordinates and it travels there “by itself”. In the script I simply pass an element selector, the cursor will travel to center of it and wait for further instructions. So, it's usable in a responsive design as well.
- *Clicking* of the cursor, thanks to sending custom mouse events. They aren't trusted, so some perks are inaccessible – like triggering CSS :hover on mouseover. I added a ripple-effect animation to it and a sound as well.
- *Typing*, in a similar fashion as clicking. I created an animation for the typed characters to appear one by one and with random delay, to look more natural. After every typed letter it plays a “typewritter” sound.
- *User actions* by adding event listeners to desired elements. For example, if it instructs the user to select specific option, it adds oninput event handler, where it checks for value and continues when the value is correct. The only concern here is for this handler to be called despite other handlers on the same element, which may include ```stopPropagation``` command.
- *Speech*, using [https://developer.mozilla.org/en-US/docs/Web/API/SpeechSynthesis SpeechSynthesis] service. And if the generated voice is not good enough, it's possible to play prerecorded audio files instead.
Tutorial in progress, showing also a red animated circle to emphasise a click.
At the bottom I added an overall progress indicator. It's animated using a CSS transition for width property set to 2.4 secs and it looks kinda nice. Most actions take around 2~3 secs (click, cursor move, short typing), so the bar is mostly moving, like a playback bar in a video player.
A hurdle I had to overcome is it's not possible to open a dropdown menu (SELECT) programmatically, so I had to create a virtual list of options and fake it as the real thing. It works for now, but it doesn't acquire proper styles, so it will look wrong on other themes and visual modes.
Another hurdle was changing the cursor to proper visual representation. I had just an arrow, but on buttons it looked weird. I didn't think it's worth the effort but changing to hand for some occasions wasn't actually that hard and greatly improved the overall impression.
The worst part was I had to fiddle with the hot spot (the point, under which the click happens). The arrow has it conveniently at [0, 0], but for the hand it's [6, 0], so I had to move some stuff a bit. I hope it won't bite me later. I won't do the I-beam text cursor though, it's even more hot spot shuffling.
When looking at the text while it's being read by the computer voice, I imagined it in a “karaoke” mode, when particular words will highlight in sync with the speech. I dismissed it as too difficult to time it correctly, but for purpose of writing this post I digged into API docs for the utterance.
There I found a boundary event, that is fired when the spoken utterance reaches a word or sentence boundary. To my surprise it's exactly what I needed. I only wrapped every word into SPAN and in the event method simple incremented index to get the correct DOM child, to which was assigned a proper CSS class. Done!
In case of an error, like the element selector became invalid or live operation caused a blank page, when the scripts detect problem, it apologizes and ends the course automatically. Meanwhile, in the background, it sends me a bug report.
Dummy DS
For as many testing modules as possible I needed a really quick way to set them up. In the past I had a “Builder”, allowing me to easily define components in a WYSIWYG manner.
Now with the simple REST API what I was looking for was actually more simple approach just to define a schema, with automatic GUI generator. Nothing fancy. My favorite tool for this job is HeidiSQL and I wanted to create something similar.

HeidiSQL
So, I made a Schema Creator (“Schemator”), where you define some basic attribute properties, like name, label, data type, mode and whether you want it as a column in the main table, or just in the form. Then it generates appropriate schema, or even the whole model. Cool.
According to my experience, in most cases you wouldn't create the schema from scratch or top of your head. You either have a specs, data model or old version of the system. The next logical step was to create a parser for QElem names pasted from a Clipboard.
To work even better I implemented a guessing of a proper data type, so elem with "is_" prefix probably is a boolean, if it has "date" in the name, it's often a date (duh!) and so on. This worked nice, but it wasn't impressive. And I had an idea for a long time, that would fit nicely in here.
The idea was to have a Data Service for mocking or prototyping, with dummy data, that would actually make some sense. Like for "Date of birth" it wouldn't just generate a random date, but it will be at least some 20 years old to represent an adult employee or user.
Or an e-mail address wouldn't be some random string with @, but if the entry contains name, it would be derived from that in a random format. Some of them will contain last name and a number, some first name and last name in lower case or not, with dot, underscore or nothing in between.
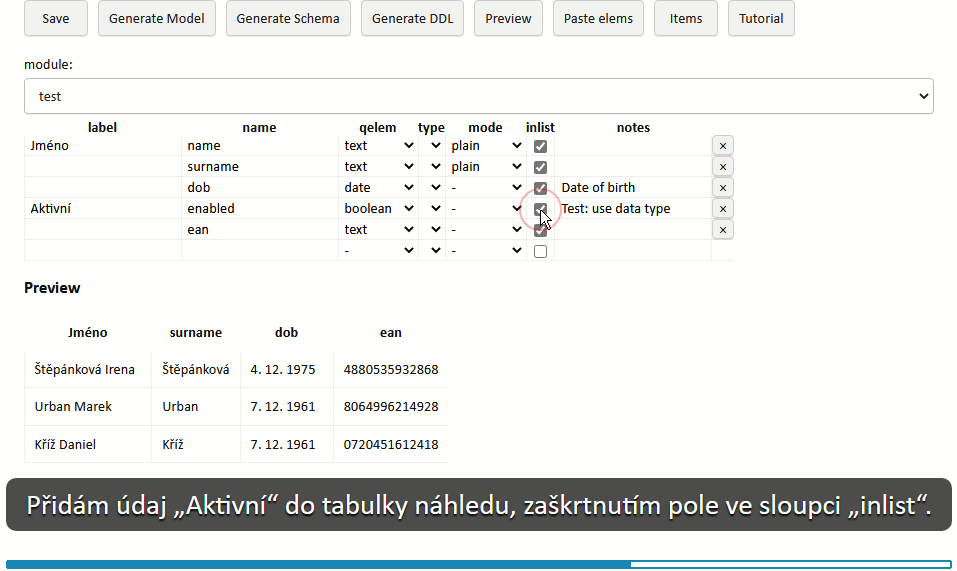
Qedy Schema Creator with auto-generated random values. Any resemblance to real e-mail addresses and people, living or dead, is purely coincidental.
Similarly for address fields, phone numbers, genders, identifiers and such, not to mention region-specific data sets (for the screenshot above I used my local Czech). The possibilities here are nearly endless.
There is also a simple editor for enumeration options, with paste support and file import.
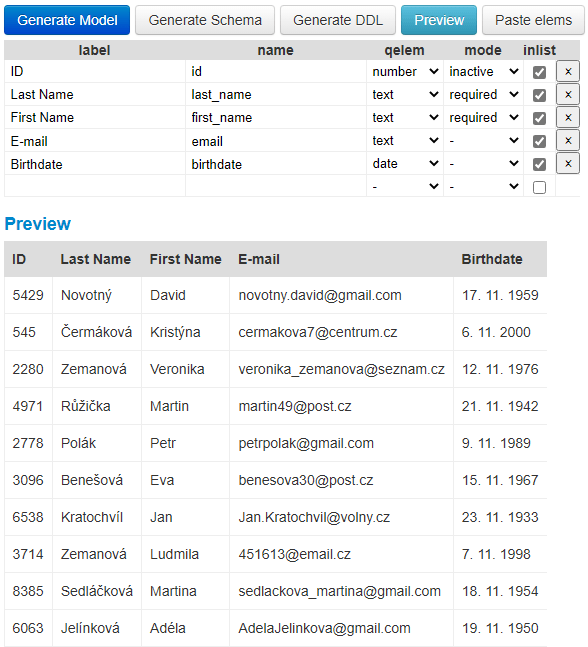
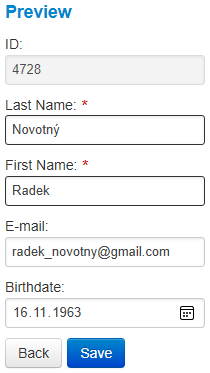
Impressive, huh? But wait, there's more. The preview isn't some dumb table, it's actually a real app. In the background it generates a working model for Qedy, that is parsed and rendered into the preview DIV.
And as in a real app, by clicking on the table row you will go to a form for the chosen record, where you can edit values with proper validations, and these changes, after saving, will propagate back to the table.
Basically, a working app, only without persistent data. I have to admit I had a blast working on it and I'm proud of the result. I started with an idea to have something, that makes the app in development feel good when showing to someone, and I ended up with something, that feels good showing to someone just by itself :-)
As a cherry on top, to work nicely with HeidiSQL, I added a support for SQL DDL (CREATE TABLE) for both import and export. So now it's super-fast to move back and forth between the model and the database. And with proper server-side Data Service (supporting DDL) it's possible to do it directly.
updateComps
Qedy.js separates the internal object model from the DOM. It's not a virtual DOM or a shadow DOM, because it doesn't care about HTML. In fact, the model itself is output format agnostic and only Converters know all the links between Components and DOM Elements. If Qedy decides a Comp should be updated, it simply asks the Converter to make it happen.
And because working with objects is fast and working with DOM is not, I implemented a system, where all the interactions are with the model only and at the end of a method call there's a call to updateComps, which passes all the changes to appropriate Converters to make them into DOM.
Because working with Converters is expensive, to prevent unnecessary calls, there's a reduction phase. For example, changing mode currently redraws the whole Comp, so if it has a child Comps, you can eliminate all their updates, because they'll be processed anyway while rebuilding the Comp.
Before this phase there's another quick loop, preloading Converters and applying scope-wide updates, like focusing a form field. This can't be done in during the reduction, because we don't control in which order the updates are, so it could be reduced before it was processed.
With the final list of updates ready, it's time to do the job. Mode changes are processed first for reasons mentioned above, and all other updated are processed afterwards. There are two basic categories: Singe (replace value) and multiple (add & remove value). All converters return a Promise, which is added into an array and ultimately Promise.all(promises) is called.
And the last part is focusing the required element. It finds the first visible instance (offsetParent is not null) and applies 10 ms delay to work properly even with mousedown event.
There's a limitation though, because I use lazy loading for Converters (so Qedy doesn't load them for hidden Components), it's not possible to use some Converter calls, like custom methods, which are Conv dependent – like changing label (heading).
There are several workarounds, like using .set("label", "abc"); method or assign the value directly with this.comps.myComp.label = "abc";.
Reality check
On one of my projects the project owner hired a junior JavaScript programmer, so there are 3 devs in the frontend team now. I gave the newbie a two hours long walkthrough of the system and we agreed on further steps.
During the following status call I was told it's too complicated and the team decided to go with a simpler approach, led by the second dev, who proposed the rewrite in the first place. I didn't protest much, because I could use some free time right now, after months of long hours.
But I expected him to have a solution in the pocket, not to come up with it along the way, as he apparently did. The project leader warned we need it up an running in a better than current shape by September and it looks he thinks it could be done.
I have to admit I was kinda disenchanted by the decision, so I didn't confront them with a warning the current version took over a year to finish. Moreover, the “simpler approach” is pretty much vanilla JS with HTML in it. In my eyes it's a recipe for a maintainability and customizability disaster and it feels like how I did stuff in early PHP 5 almost two decades ago.
I created quite comprehensive list of all the features the current and past versions have, to give him some kind of check-list and overall scope of the task, but I got the feeling they just read it and were done with it. I also hoped it might put them into perspective how much work it will be.
But what strucked me the most was the whole concept of QetriX was apparently incomprehensible for them. They didn't get it's pretty much just a different approach to MVC, because they argued the new version will be MVC at last. My primary motivation was to make stuff easier – did I fail?
I admit I'm no mentor and I didn't want to dump all the quirks of QetriX on them, so I glossed over it and explained only modules, components, datastores and converters. In my eyes this is sufficient enough and everything had an example and some documentation.
I probably didn't emphasise enough the HTML structure is defined in Converters, so the second dev tried to manipulate basic Converters into what he needed for his design to work, instead of creating a fork of the Converters he used. He basically used QView as DIV and didn't ask. Not to mention he wasn't supposed to code the module in the first place...
Anyway, pretty much all my projects went away from IE11 now, so I don't need to stick with ES5 any more. ES6 allows for much leaner code in many ways, so I decided to try what I can do with it. Because it suppose to be fun project (at last), to distinct it from work, I'll use VS Code for it.
And because it should be as straightforward as possible, my goal is to keep everything within 1000 lines of uncompressed and well documented code.
Quid toolchain
I created the Framework as a guideline how to create web apps “my way”. It's open source and available in many programming languages.
Because the Framework itself is quite bare bone, I wanted to add a layer for rapid web app development. That's how Qedy was born.
Finally, implementing Qedy is Quid, which isn't a framework any more, but rather a final product. Quid doesn't contain building blocks, but final layouts and functionalities.
Full Circle
In late January I started working on a small intranet app, exactly to my liking. I had such thing in my shelf and in my head already, and this was exactly what I needed to follow through.
I was really happy about the progress I made there, and it became my pet project very soon. I finally finished my idea for managing modules (inspired by WordPress plugins) and it kinda clicked together. But what's often the case, my gut told me it's not optimal, until I found a case, when it falls apart.
The problem was that in some instances I needed the same page to belong to multiple modules, which wasn't possible. Eventually I decided to rework the concept, before it's too late.
I customized data model to suit the described case. I don't know if it's because of my mindset, but soon enough it started to look quite familiar. It didn't surprise me that much, that what I ended up with was an adaptation of Qedy's data model, only instead of objects I had pages and instead of elems I had features.
When this occurred to me, I renamed it to the Qedy conventions, because it's more suitable anyway and I spent over a year perfecting it, so I can think well enough along that line.
Before I started to rework the intranet app itself, I created a simple PHP script for managing data, with Adminer as inspiration. Partly as a proof of concept, partly as a tool, partly just for fun – I didn't make an old-school PHP script like this for years.
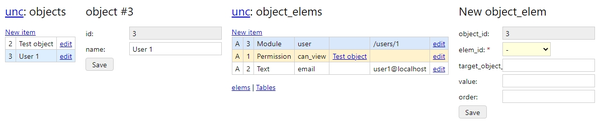
Object Elems in Qedmin
I must say, I was quite pleased with the full circle. I started with a completely blank slate, created a data model in a different manner, but iterated towards what I thought was a perfect universal data model at that time and apparently, I was right.
The only difference is I'm not going to utilize it to its full potential, because I want to have an option to tweak data in the database (even it's not a good practice) and Qedy's JSONs and particles are not good enough for that. This time I'll try to keep particles only for objects themselves (classes and relations), with data in custom tables.
Autumn cleanup
I noticed some concepts in Qedy ain't right. For instance, I always perceived Modal window as a separate entity, but in fact it's just bit more complicated QView. This also once again confirms, that my choice of just four component types (elem, form, list, view) is indeed sufficient.
Similar problem was with various frontend perks, like content prefetching or smooth scrolling. I added prefetch to an ordinary QList as f_prefetch feature and I created some extensions (“plugins”) for QView_Page.
Subjects
With the team we finished a module for subjects (people and companies). We were hoping to get a shortcut, but the customer disagreed :-), so in the last months of many improvements and fixes I was forced to add a lot of technical debt to the codebase.
Another setback was the customer is still using IE11 and the original Edge, which added more complexity to the code, as various polyfills were required and also separate stylesheets, because there's no way to distinguish between the two using just media queries:
- IE11:
- @media all and (-ms-high-contrast: none), (-ms-high-contrast: active) { ... }
- Edge:
- @supports (-ms-ime-align:auto) { ... }
This was our first deployment of QedyJS, where we gathered awful lot of experience, and also the module is only a temporary solution for the customer, because he contracted another company, that are unable to provide their solution at the moment for legal reasons.
So I took the opportunity and created basically a working “demo” of what the final version of QedyJS should be capable of, only without all the hacks, tweaks and crutches. It's always easier to think of what to do differently, than what to do. This demo became a foundation for the Mk. III announced back in January and was largely enhanced since – Mk. IIIb, if you will.
There were some approaches I didn't like, some of them didn't work, some of them were sub-optimal, some of them was proven and will be kept, some of them were introduced for the first time and some of them were put aside for the time being.
I gathered all of the above and started once again with a clean plate. This time not as my primary project, but rather as a side project to pamper and enjoy. I wanted to have the time to do it really properly, to be able to elaborate on ideas, to have an incubator for them.
Comp-Elem Modes
There are six basic modes for components:
- *hidden*: component is not in DOM and therefore not visible to user;
- *plain*: component (rather it's text or value) is represented by plain text;
- *inactive*: component is read-only or disabled, but as a form control;
- *normal*: component is an editable form control;
- *expected*: component is marked as "expected", which is just visual distinction and overall works just as “normal”;
- *required*: component is required to have a value before form processing.
To make things easier, if you need to set a particular mode to multitude of elements, you can simply set a mode to their parent component, instead of every element separately.
But there are cases, in which you probably don't want to override the mode: if you have an element defined as inactive, like a computed value, you don't want it to suddenly became required. And if it's hidden, it should stay that way.
From such rules emerged the following table:

Results of mode overrides by component (rows) for elem modes (columns).
I did several tests and it works as expected. If your expectations are different, you can always set mode directly to elements and omit using bulk mode assignments via parent components.
JavaScript Framework Mk. III
If I find reengineering favorable, I usually go for it. Therefore major versions with breaking changes appear fairly quickly in the beginning of a new software product, allowing me to stabilize the API as soon as possible.
On the other hand, most changes are in QedyJS, so unfortunately almost none of the current improvements will go open source.
Scopes. Multiple modules at once, scope is passed with the component, which is no problem in most cases. But it's a little annoying, since I decided to have no cirucular references, which means a component can't contain scope object and therefore I have to pass component and scope separately in two parameters. And for the rest you must specify the scope, which is also annoying, but also necessary.
Speaking of scopes, I reimagined JavaScript scopes as well. Now module methods have direct access to the scope via this and because I decided to “trust” converters, they have now direct access to components and therefore are able to modify them. It makes a lot of things much easier and more streamlined.
I waited with a release many months, to have full functionality right from the start. Nothing was postponed (like datastores in Mk. II), because that's what bit me in the butt in the past the most.
Found even more great articles and talks about JS performance and did tremendous amount of micro optimizations in the code, especially in loops, where it makes sense the most. Some (if not most) of them are probably unnecessary, but I'm a performance freak, so it feels good to have 'em all :-)
Got rid of domLinks, now links are bundled with the component. The same applies for items and data-realted logic (e.g. sorting and filtering) were moved from components to datastores.
Some of original designs are great and in fact some of them even goes back to Mk. I. And don't let me start with the whole concept of QetriX, I must admin it makes me proud the core basics I established over a decade ago still works perfectly.
JavaScript Framework Mk. II
My next big project is a frontend for enterprise web app. My assignment was to find a JS framework and the original idea was to use Sencha Ext JS, because the other team in our joint-venture uses it, but I also looked into Angular, React and especially Vue.js, which was my personal favorite.
I quickly figured out Sencha is vast, with complete set of widgets, but hard to learn, quite expensive and even one long term user wrote he wouldn't use it for a new project, so in my eyes Sencha was out.
I tried some demos for Vue.js and because it was exactly what I was looking for, I wanted to know how it works inside. I studied some basic Vue internals and virtual DOM and it got me thinking the idea is not that different from how I implemented QetriX Components years ago in PHP.
My big mistake in Mk. I was I relied solely on DOM, so most variables were strings (because input.value returns a string) and I had to convert it to proper data type all the time, which created a messy code. Now all data would be in the model, so variables will always have a correct type.
I already had a JSON definition for layout (nested components) from PHP version of Qedy, so I used it to create a proof-of-concept and it worked quite well. There's no reactive binding magic, all changes are declarative, but this way it should perform better with smaller memory footprint, than real virtual DOM. This is the best excuse I came up with ;-)
DOM is generated by Converters and some parts of it are accessible via internal key-object register called “domLinks”. For example, in a form I can access all the inputs and other fields to get/set their values. I did it this way to simplify object model in a different languages.
Client-Server Web App
I'm often oldschool and even I keep an eye on contemporary approaches, I don't really pay much attention to them. I'm probably worried it's just a short term fashion or an upcoming dead end, but sometimes I miss a lot for a long time – like this time.
I prefer server side HTML rendering, because it's a single solution for both users and robots. I perceive Node.js as yet another Java and I have no problem switching between languages, so using JavaScript also on the server is not that appealing to me.
Years ago I participated on project, where client side was created using GWT in JavaScript, while servlet only provided data via API in a form of JSON messages. I liked the idea, but I didn't see myself doing such thing.
Few years after that I participated on a project with the same approach once again and still didn't see what it's all about. As a sole programmer on most of my projects I don't have the need to divide the code. But this time I finally wanted to try it. My opportunity came in less than a year.
The project for it was perfect – transforming old intranet app, created in Microsoft Access, into a modern web app. Because of the Microsoft ecosystem in their IT department, my proposal to try the “recently” released ASP.NET Core looked like an obvious choice.
I was little worried the Core platform may lack some features, but version 2.x was mature enough to provide everything I needed and I had QetriX up and running in just a few days.
For the client side I created standalone HTML templates, that defined a layout and components. Because nowadays the DOM is optimized enough, I opted out of virtual DOM, defined custom properties as “data” attributes and the rest as QetriX Modules.
It worked surprisingly well, but I also encountered some drawbacks. First of all, I worked with a lot of numbers, but values and data attributes are strings, so I had to convert data types all the time. Second of all...
QedyJS Mk. II
I started this year under new management and only after two weeks in I'm already going to ask my new boss to postpone the development and base the app on a reengineered Qedy, because I figured out a way how to cut my database schema to half, removing a lot of relation tables (leading to much slicker code) and making more sense of what's left.
Now the whole project is moving more towards the original simple QetriX Particle system, which I spent quite a time developing, so I know well how to do stuff that way.
Also, later I found out I can easily use Particles for object attribute/relation DB cache, which made me quite happy, because the whole concept just clicked there.
Qedy
Golfers have caddie, businesses have Qedy. Both do basically the same job – supports the star in every way possible. And there are really many ways for Qedy!
Qedy is a commercial extension of the Framework, which means most of the shared functionalities won't be open source. Qedy is purposed for rapid development of intranet and extranet information systems.
With Qedy, instead of coding, you simply create your apps in Builder, where you can see a mockup of GUI, define a data model, create label translations and more.
Qedy Logo: “ED” from rotated Q, styled as Möbius strip.
But Qedy isn't just for web apps, you can create websites with it as well! Using simple block approach you add content for the page quickly and easily. In fact, exhibit A is this blog, whose content editor uses exactly that.
With Qedy you can define component conditions, visualize them and test using defined values.