InputManager
There are quite a few ways, how to control a game: Keyboard, Mouse, Touchpad/Trackpad, Trackball, Trackpoint, Gamepad, Joystick, Racing Wheel, Touch, Motion, Gestures and more. Many of them are overlapping, because different players have or use different devices.
Nowadays, when using mouse and keyboard, it's common for a 3D shooter to use WASD and mouse, but two decades ago it was common to use just arrow keys to move and turn, with other keys for strafing, firing and doing stuff.
Therefore game engines often contain a dedicated system to incorporate all of them, with customizable controls on top of that. You basically define “aliases” or “codenames” for all controllable actions and then you set them true, if the corresponding keys were pressed, and to false otherwise.
Modern browsers have support not only for keyboard, mouse and touch, but also for gamepads and various sensors, like accelerometers (motion), gyroscopes, proximity sensors, magnetometers or ambient light sensors.
Every device is firing events, so you only add event listeners for button-pressed and button-released events, and in their handler functions you set appropriate values for appropriate actions. You also need to account for multiple key pressed, so you can't reset everything when button is released.
- document.body.addEventListener("keydown", function (ev) {
- ev.preventDefault();
- input["k_" + ev.code.toLowerCase()] = true;
- inputManager();
- }
- document.body.addEventListener("keyup", function (ev) {
- ev.preventDefault();
- input["k_" + ev.code.toLowerCase()] = false;
- inputManager();
- }
In the example above, input will contain an entry for all pressed and released keys, which will be handled inside inputManager:
- function inputManager() {
- input.action = input.k_space
- || input.p_buttons > 0
- || input.t_touches > 0; input.menu = input.k_escape;
- if (input.handler) input.handler();
- gameLoop(performance.now(), true);
- }
It's very simple implementation, using only “action” and “menu” actions. There's also custom event handler, in case something comes up, that will need a special treatment – like in-game pause menu.
Buttons are one thing, but there are axes as well. They use scale in the interval of <-1; +1>, instead of simple true/false boolean values. Unity cleverly implements virtual 1D and 2D axes, where you dedicate one button for +1 and another button for -1 value of a particular axis.
When pressing two buttons at once, magnitude of the resulting vector is greater than 1, so in practice a game character may move 1.4× faster diagonally. To remedy this issue, 2D virtual axis off normalized value by default, with option to revert to raw data.
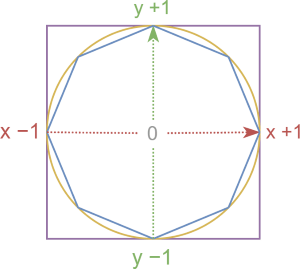
Values for virtual axes. Yellow circle is for analog, purple square is for buttons and blue octagon is for normalized input.
You can also apply normalized values on analog axes and use thumbsticks as buttons, to restrict a game character to move in only 8 directions.
When controlling movement using virtual axis, it looks better to gradually increment the value, so there's the “increment” setting, and when you need to gradually decrease the value after releasing a button, there a “gravity” setting.
Items
In my project I kinda overuse the term "items". For me, items means any collection of elements, like table rows, menu options etc. In most cases every item has two main properties: “text”, visible to the user, and “value”, mostly in a form of some system ID.
- items: [
- { value: 1, text: "Item one" },
- { value: 2, text: "Item two" }
- ]
And because JavaScript is very generous with different data structures, I want to support all of them. So for QList items could be:
- simple array (text = value = array element),
- array of objects (either text and value should be present in all objects, or the parent Component should provide
textKeyresp.valueKey), - object (key = value, value = text).
In arrays it's possible to combine plain elements (strings, numbers...) with objects, but all objects must contain the same textKey and valueKey.
For objects beware, the order of keys is not guaranteed. If you need items to have certain order, use array.
Search box command line
The search box is asking for being abused as a command line, for several reasons: It's everywhere, it's easy to reach, it's simple and you can type anything into it. So I do, actually I've been guilty of that for ages - since QeX.
I usually prefix commands. I started by simply adding a space before the command, but sometimes there are spaces in the pasted text, so using a whitespace is not good idea.
So the next best thing is using two dashes before the command. The advantage of dashes is there are two keys for them on the keyboard, one of which is neatly in the corner of numpad, so it's very easy to find.
KeePass and PuTTY
Install PuTTY and add it to PATH in Windows (System Properties > Advanced > [Environment Variables...] > System variables > Path > [Edit...] > [New] > e.g. C:\Program Files\PuTTY
In KeePass: Tools > Options > Integration > [URL Overrides...] > [Add]:
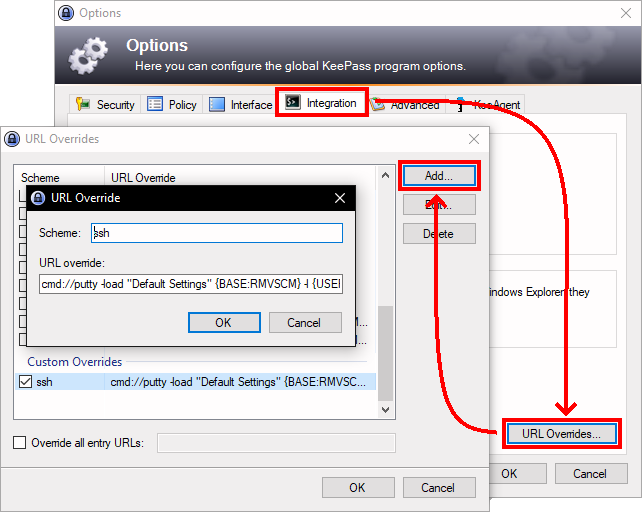
Scheme: ssh
URL Override: cmd://putty -load "Default Settings" {BASE:RMVSCM} -l {USERNAME} -pw {PASSWORD}